![]()
By
Cree Vicar Dave ~ SASS Life #49907
Many SASS shooters use RVs when they go to a match. A couple years ago the Vicar’s Wife and I became the proud owners of a 29 ft. 1969 Airstream trailer. This is not the first Airstream we bought and probably won’t be the last.
Previously we purchased a 26 ft. 1966 that we restored. My brother-in-law, Russ, kind of talked me into getting an old Airstream as he and my sister, Gin, have had one for going on three decades now. This 1966 was a challenge as older trailers are, but Airstreams seem to hold their value a little better than most as the body is constructed of an aluminum outer and inner skin with an aluminum skeleton.
Every few years Airstream changed the style of their trailers. Their first ones back in the 1930’s were shipped to the buyer in kit form with instructions on how to build it. In the 40’s and 50’s they had manufactured units with stoves and refrigerators that looked similar to ones found in an apartment. Most had a bathroom stool but no holding tank. Even though our 1966 has a holding tank the owner’s manual says something along the lines that when you get to your camping site, dig a hole and run the waste water into it and cover it up when you leave because the holding tanks were not very large. The 1966 through 1968 models were very similar. In 1969 they went from square cornered windows to radius corners and changed the window opening system. In 1970 the fresh water tank was moved from under the sofa in the front to under the floor in the middle of the trailer.
 |
 |
 |
|---|
As with the 1966 this 1969 was not a project for an easy quitter. The first thing that had to be done was to rid it of unwanted wild life. The trailer comes with an aluminum under belly that was pop riveted to the frame cross members. Over the years of pounding down the road the rivets loosen and fall out leaving gaps between belly sections where mice et al venture in to take up residence. I’m not going to tell you how to remove these pesky critters because of “animal rights wackos”. You could politely ask them to leave to start with, and then if they decline your offer you have other options right up to and including court action.
After the critter round up I used stainless steel self tapping screws (around #10x1”) with large (1” OD) stainless steel washers to pull the under belly back into place. DAP acrylic silicone clear caulk works well on the threads to keep the screws and washers in place. A cordless drill motor is a good tool for this. While you are down there you might want to check other areas where varmints can crawl in. There is a slot that the step slides up and down on wide enough for a small mouse to get in. Also after 40+ years it would be a good idea to change all the brake assemblies because they’ll probably need more than just shoes.
The next thing to look for is a soft spot in the floor just inside the door. The door seal wears out and allows water to leak in resulting in the plywood floor rotting out. Usually this is a small area and is a fairly easy fix. The window seals might need changing also. Some of the windows on the ’69 did not want to come off the trailer as designed, so I just put new seals along the sides and bottom. They have a new “D” shaped seal now that works a lot better than the old style.
Next check water lines. Usually sometime or another a previous owner drove the trailer hard and put it away wet for the winter. There are drain valves in the back, and air can be used to blow out the lines, but things are often overlooked. Today RV antifreeze can be used. You can cut the copper lines and splice with hose and clamps, resolder or you can replace all the lines. If the drain traps leak you can use a silicone caulk and duct tape or replace it.
Check the wiring. It helps if you have a cowboy buddy that is an electrician. In the 1966 everything was OK but the 1969 had a dead short in the 12V DC light system. After hours of checking we found the problem. One of the wires that fed a bathroom light had a bare spot in the insulation. Fortunately when we pulled the wire out there was enough extra to wire the light after the bad spot was cut off.
Check the hot water heater. If it works it’s good but many of the originals were LP gas only. LP/Electric is nice when you have a hook-up. I found an Atwood just the right size for the opening. On the older trailers this is more of a challenge as the style they used then is no longer available to my knowledge. The fresh water tank and holding tank need to be checked also.
 |
 |
|---|
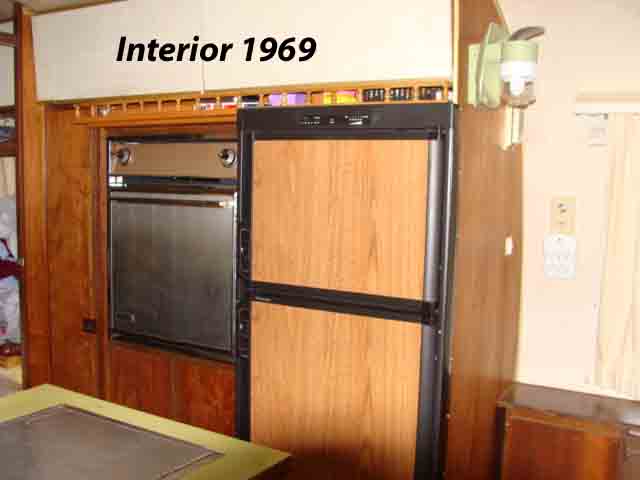
If the refrigerator is not working you can get new ones but the size is usually different. Most trailers older than 1969 had the shorter ones of around 3 foot high and were narrower than the new ones for the same cu. ft. You can redo the cupboard area to make it fit but I would warn that any major alteration may diminish the value of the trailer. Also check the fridge vent. The older models did not have a screen on top to prevent birds and/or squirrels from entering to build nests. Our ‘69’ vent was packed full with pine needles and leaves by a fowl looking for a good home.
The sofa foam and bed cushions may or may not be usable. There are people who will reupholster the sofa and make mattresses for the bed. We did it ourselves but it is a lot of work. I would recommend getting a good quality, firm foam. For the ’66 it cost around $300.00 to replace the foam for the sofa and bed. A few years later it cost around the same price just for the foam for the sofa.
Check out the counter tops. Some look like new, others not so new. The wood finish on the ’69 cupboards was faded and milky colored. I lightly sanded with a green “Scotch Brite” pad and applied a coat of Min Wax, Antique Oil Finish, Hand Finish Soft Lustre. The results were amazing. They look like new and the grain pops right out at ya. I’m reminded of what it says in Nehemiah 6:15, “So the wall was completed on the twenty-fifth of Elul, in fifty-two days.” They restored the wall of Jerusalem in 52 days. That’s far less time than it took us to restore the trailer. But they probably had more help. I kept a rough total of time spent on the project. It was over 500 hours plus the help of others.
When looking for a vintage trailer inspect the counter top, windows, cupboards, outer and inner skin, see what appliances work, etc. Most things can be repaired or replaced but at a cost. You can look up on the NET the condition/value of an Airstream to find out what to look for and the price to pay.
Parts for a 1969 Airstream and newer are more available than for the older trailers. There are several places on the NET where you can order items like door latches, rubber seals, windows, aluminum LP tanks, etc. To name a few:
If you need something put in a WEB search, it may pop up. Also for a few bucks a year you can join the Airstream Club that opens up many new avenues. Depending on what part of the Country you live in an average older Airstream could be found for under $3000. I would estimate the cost of restoration from 6 to 10K if you do most of the work. If it has a good awning, hot water tank, fridge, AC unit etc. the cost would be much less. And when polished the value is around $20,000.00. Not bad when a new one is close to three times that amount.
Next time I’ll cover one of the projects that needed work.
I would like to thank our sons, Gold Tooth Dave, and Matthew, brother-in-law Russ, Gold Tooth’s brother-in-law Terry who is an electrician, Mt Forest Ron, Greg at Inland RV and others and especially the Vicar’s Wife for all their help.
Hope ta see ya on the trail
God Bless,

![]()